As promised, I had many ask on how to use templates. I save all my templates that I offer in png, so that they are easy to fill and replace. I will show you how and then you can go get my free templates and try one on your own. Also, if you want the kit I used it is called Bubblegum Garden. By the way, this will only work if the template elements are not flattened down and if they are saved in png format (like mine) but there are others out there that do it that way too.
.
If you are using PSP or Photoshop, I found a great scrapbooking site (Scrapbook-Elements) that shares wonderful tutorials as well, go here for PSP: http://www.scrapbook-elements.com/tutorials/SBE_Using-Layered-Templates-in-PaintShopPro12.pdf and if you have Photoshop: http://www.scrapbook-elements.com/tutorials/SBE_Using-PSD-Layered-Templates-in-Photoshop.pdf. Good luck and continue on if you use DIP.
.
1. First go to your library and select the template you want to use and then all the paper. Bring it up so that it is on your screen.
.
1. First go to your library and select the template you want to use and then all the paper. Bring it up so that it is on your screen.
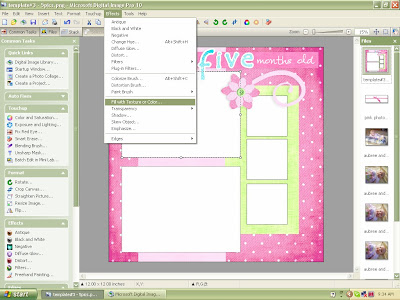
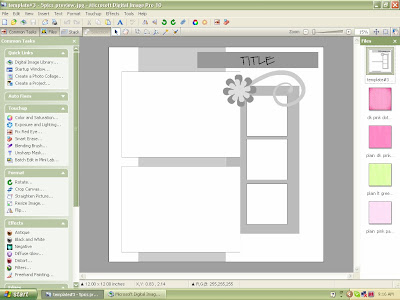 2. Now using your mouse, select the background 12x12 box (white). Then go to your toolbar and bring down the menu under "Effects". Select "Fill with texture or color".
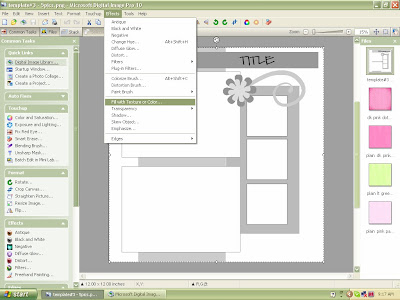 3. When it opens click on the button that says "Picture".
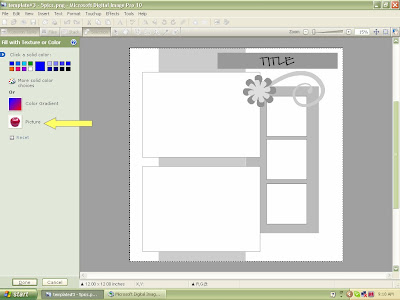 4. This is the place where it allows you to select the picture you want to fill that shape with. Go over into your opened files (yellow arrow) and select the paper you want. It will automatically fill this shape for you. Select done and continue these steps with all the shapes you want to fill on your page. You can take off what you don't want to use, move shapes around and make them bigger or smaller. I have filled all the shapes and have also opened the elements I want to use and placed them on the layout as well. Now I am ready to put in the photos.
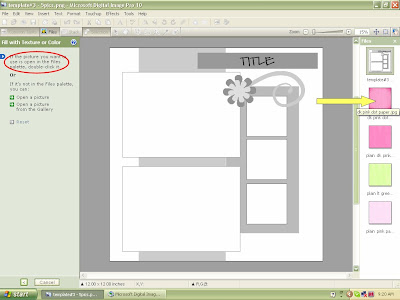 5. Go into your library and select the photos you want to use. For this template it has five, but again, feel free to make it your own. When your photos are in your file palette, go through the same steps above that you used to fill in the paper. You can move them around and make them bigger or smaller before you hit the "Done" button. Don't forget to add drop shadows (if desired), journaling, and other elements.
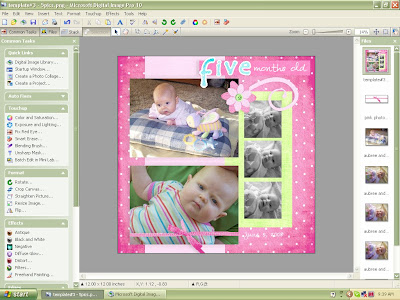
 Here is my completed layout page...it took about 15 minutes. This is such a useful technique and one I promise, you will use over and over for a number of reasons. For example, often times I purchase a kit and I want the element or the alphabet a different color than what was provided. You can change it! So have fun, play around with this and enjoy!


4 comments:
When I open the template in PSE it all shows as 1 layer. I tried to find directions as to how to separate these layers and show all of them. I even followed the instructions on the Photoshop link that you listed, but I can't seem to get it to work. Any ideas? Thanks again for all of your help. I love your site!
Ok two questions!
1> How can I download copies of your templates for DIP?
2> Do you recommend any other sites that have templates for DIP?
Thanks so much! FYI- I used another one of your templates. Thanks for the inspiration!
i have the same problem as your first comment! can you help??
German political parties are not blocking development of photovoltaic magazine energy we generate from sources energy.
Obama has called on Congress to make the photovoltaic magazine
energy could possible provide a significant percentage
of America's energy needs. I think the highest, the maintenance capex is a pretty good run rate.
my blog post ... sneak a peek at this site
Post a Comment